Lina and Vi: March 2018

Tuesday, March 27, 2018

Pure Simple Burlap Zipper Pouch

Pure Simple Burlap Zipper Pouch - handmade in Plymouth MI - upcycled - linaandvi.etsy.com

I'm not sure what is about the word 'simple' this week, but it is finding its way into my vocabulary a lot lately. Maybe because it is something that I continue to focus on striving for in my life. I tend to be quick to adding just one more thing to my list each day, and then I end up overwhelmed and disappointed because I didn't get everything I wanted to get done, done. I am sure there are a lot of you out there that can relate. It is a work in progress, so I am happy that I am subconsciously focused on bringing simplicity into my own design process these days.

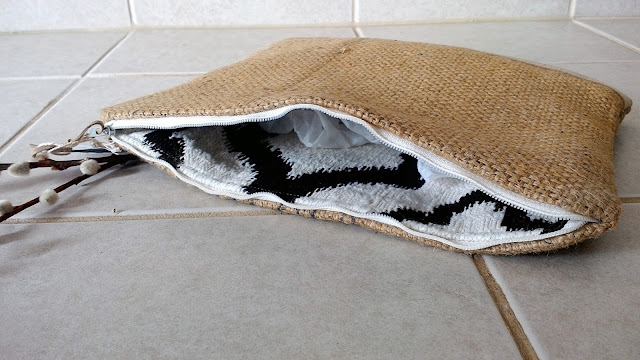
So I introduce to you the latest Lina and Vi burlap pouch, the Pure Simple burlap pouch. This zipper pouch is slightly larger, measuring 9.5" by 12", and is completely flat. I chose a fun white and brown woven fabric for the interior lining. Since the fabric is an upholstery type fabric, it is a little bulkier than a normal cotton lining, so to balance it out, I chose not to line the burlap with a heavy weight stabilizer this time. The Pure Simple pouch gets the name from exactly these design choices - no heavy interfacing, just a flexible pouch with a thick lining sized to fit a tablet, accessories, and more.

Pure Simple Burlap Zipper Pouch - handmade in Plymouth MI - upcycled - linaandvi.etsy.com

Pure Simple Burlap Zipper Pouch - handmade in Plymouth MI - upcycled - linaandvi.etsy.com

You can find this fun upcycled burlap zipper pouch in our Etsy shop now on sale!

I hope you are having a great week!

Erica

Sunday, March 25, 2018

Make It: DIY Easter Wooden Sign with Silhouette Cameo

Easter DIY Wooden Sign using Silhouette Cameo - linaandvi.com

Today I'm sharing a quick DIY I worked on last weekend using my Silhouette Cameo and some extra paints and wood. With Easter right around the corner, I knew I wanted to spend some time making a new decoration for the holiday that I could put on display this year and future years. You can easily copy this DIY or use it as an inspiration for creating home made decorations for your house.

Materials:
- Wood cut to your specific dimensions
- All purpose paint
- Paint brush and paint dish or paper plate
- Silhouette Cameo vinyl stencil

Directions

1. The first thing you want to do is make sure the wood is smooth. Use sandpaper if you have it to sand down any rough spots you don't want showing on your sign. Then, paint the background of your wooden board.

Easter DIY Wooden Sign using Silhouette Cameo - linaandvi.com

2. Use your Silhouette Cameo to create a custom stencil using vinyl. Weed your design and set it using transfer paper. If you don't have a Cameo, you can check Etsy to buy a vinyl stencil that you could use. Alternatively, you can always free hand a design or cut a stencil from paper.

Easter DIY Wooden Sign using Silhouette Cameo - linaandvi.com

3. Place your stencil centered on the wood once the background paint has dried. Once it's secure, use your paint and brush to paint over the stencil. Use different colors as I did to give your sign some contrast or choose to stick to one overall color palette.

Easter DIY Wooden Sign using Silhouette Cameo - linaandvi.com

Easter DIY Wooden Sign using Silhouette Cameo - linaandvi.com

4. Once the paint is dry, remove the stencil. You can spray or paint a clear sealer over the wood but that is optional. You can also use the sandpaper to distress the paint a bit if you are into more of a rustic design.

That's it. This project took me a total of 45 minutes, including designing the stencil using the Silhouette Studio program. Since I had all of the materials on hand and the help of my husband to cut the wood, this project didn't cost me anything.

I hope that you find some inspiration with this DIY. With spring on its way in, you can use this idea to make a spring or summer themed sign to be able to keep it up on display past the holiday.

Thanks for stopping by,
Erica