Lina and Vi: December 2015

Thursday, December 31, 2015

Thank You for A Great 2015

Lina and Vi plymouth mi, burlap bag, 2015 recap

As we near get into the final hours of 2015, I just wanted to take a few minutes to say thank you for all of the kindness and support this past year for my small handmade business. I was able to meet many new customers over the course of the year, and I had so much fun being able to dream up new product ideas to share with you. I received requests for Lina and Vi burlap items as gifts for major, personal events from baby showers to destination weddings as well as Christmas gifts for loved ones and decor to adorn your Thanksgiving tables. Being able to create something that others can enjoy is amazing to me.

Burlap isn't the easiest fabric to sew with, and I would be lying if I didn't admit that there are many times when I question whether it's time to turn a new leaf and try a new, easier material.  That time hasn't come yet as I'm not finished creating and dreaming up new ideas to repurpose burlap. For now, I'll continue to walk around my house (and the neighborhood, let's be real) with burlap fuzzies stuck to my pants and scattered among my home as a small price to pay to work with this fabric that has so much potential.

I hope you enjoy your New Year and hope to see you back here in 2016!

Erica


Tuesday, December 29, 2015

Updates PLUS New Cobalt Blue Michigan Pillows!

Great Lakes burlap pillow - Lina and Vi

And, we're back! I hope you had a great holiday this past week, celebrating and spending time with family and friends. My husband and I traveled around southeast and mid-Michigan to spend time with family. I think the most exciting thing for us was that it was our first Christmas with our pup, Ellie, so we had fun watching her tear open a few small gifts.

The weather is a bit dreary here in Michigan, but with a week off from my full time job, I'm lucky to be able to stay inside, drink hot cocoa, and sew! I just completed two new versions of our popular Great Lakes and Michigan Home pillows using a fun cobalt blue fabric paint, rather than the usual navy blue and black. I asked my husband, "How would you describe this color blue?" and he said, "Honolulu blue...like the Detroit Lions." I am not a huge football fan, and living in the Detroit area all of my life, I would not have known that. Is that bad? I don't know, but I opted to go with a cobalt blue description on these instead. I'm sure I'm not the only one out there who doesn't know what color Honolulu blue is, right? ;-)

The Great Lakes pillow is a smaller square pillow, measuring 11 inches by 11 inches. It's our smallest pillow yet, and I wanted to make something versatile that could be added among other, larger pillows on a couch. I love how the color turned out, and I think it works well with the lake theme!

Great Lakes burlap pillow - Lina and Vi

The second pillow is a variation on our popular Michigan Home rectangle pillow. It measures 8 inches by 10 inches. Similar to the Great Lakes pillow, it is hand-stenciled using the cobalt blue paint, a small departure from the navy blue which was previously available in this design.

Michigan Home pillow - Lina and Vi

I also did sew up a new Michigan silhouette pillow as a back-up so that I have one ready to ship for any new orders. I've shared this pillow a couple of times in the past, and you can always see current photos in our Etsy shop.

Our repurposed burlap pillows were a hit this holiday season, since they are great personalized gifts for all occasions. I'm working to sew up back-up for new orders that come in during the next few weeks, but if you're looking for something custom, please message me (Erica) at linaandvi at gmail dot com or via our Etsy shop.

Enjoy!
Erica


Tuesday, December 22, 2015

Make It: Stenciled Burlap Pennant Banner


I'm here today to share a fun, new DIY tutorial on how to make a burlap pennant banner. Since the Christmas season is upon us, I had been wanting to add one new handmade decor item to our holiday decorations this year and chose this eclectic banner to use up some of my old burlap scraps. I worked on this project over the weekend, requiring about two hours on two different days.  The bulk of the time is spent creating the stencil and waiting for the paint to dry.

I'll be sharing the step by step directions but want to point out that this project is completely customizable to any theme, event, or color scheme you are looking to embellish. I'm thinking birthdays, baby showers, engagement parties, bachelorette parties, you name it! It doesn't need to be burlap or painted at all, so feel free to skip steps or modify these instructions to fit your desired design.

Let's do this!

Supplies:

burlap (repurposed from an old project or old burlap sack if possible)
fabric paint
sponge brush
craft scissors
printer and paper
iron
thread
twine
freezer paper
pencil
rotary cutter or fabric scissors
pins
sewing machine
computer
Xacto knife
measuring tape

Instructions:

1. Begin by creating a template of the pennant. Use a piece of printer paper to either draw or fold the paper into a triangle. My triangles measure about 8 inches on all three sides. Cut out the paper template.

2. Lay the paper template on top of your burlap. Using fabric scissors or a rotary cutter, cut out as many triangles as you need for each individual letter of the word(s) you would like the banner to spell out.  Iron all pieces using steam and a high setting setting.


3. Now, switch to the computer screen and using a program like Word, type up the word or words you want to spell on your banner in a font of your choice. Print out a test page to measure the size of the letters. Adjust the font size and reprint as needed.

4. Once you have the text printed in the desired size, cut a piece of freezer paper and lay it on top of the text with the glossy side down. Trace the letters onto the freezer paper using your pencil. Once complete, cut them out using an Xacto knife on a protected surface. Separate each letter by cutting around each stencil with craft scissors.


5. Next, you will iron on the freeze paper stencil to each of the burlap triangles. Using measuring tape, center the stencil on each of the triangles. Use a hot, dry iron to secure the freezer paper to the burlap. Do this for each letter and each triangle.

6. This is the fun part! Now you will paint over the stencil using the fabric paint and a sponge brush. Make sure to add paper or scrap fabric under the burlap to protect your surface under the burlap, as the paint tends to bleed through the loosely woven fibers. Follow the instructions on the fabric paint bottle from the manufacturer. In some cases, you may need to 'seal' the paint by steaming it with an iron. For some reason, my fabric paint was much more neon pink than red, but I still like how it turned out.


7. Peel off the stencils once the fabric paint is dry and admire your work up to this point. I didn't forget about the sewing machine sitting there behind you! On two sides of each triangle, sew a zig-zag or other decorative stitch to finish the raw burlap edges. This will keep the burlap from fraying. If your triangles do not have three equal sides (hello, high school geometry), make sure you are finishing the two sides that are equal and hang vertically. I used a metallic gold thread for my holiday banner as I love the look of burlap and gold together.

8. Grab your roll of twine and measure out how much excess twine you want to border the beginning and end of the banner. Leave enough to allow you to tie it to something to hang it up with some slack for draping. Lay out each triangle in order to check your desired spacing between letters. Then add the same amount of excess twine as you did to the beginning of the banner to the end of the banner, just after the last letter.

9. This last step is tricky but with some patience and some pinning, it will secure your burlap triangles to the twine. Start folding over a small hem on the top of the first triangle and sandwich the twine within the hem. Pin to secure. Continue until the entire top of the triangle is pinned to the twine with a neat hem. No raw edge. 

Now, you can continue pinning the additional letters or you can pin them as you sew, as I did. To start sewing, you will line up the hem of the top of the triangle on your sewing machine with the twine secured in the hem. Using a small zig-zag stitch, begin stitching right side up to sew the hem with the twine inside. Remove pins as you go. When you finish a letter, pin the next letter if you haven't done so yet. You can continue the stitch line through the entire banner or sew each triangle in separate stitches.


10. Trim threads. Hang up. Have a cocktail. Admire your work!


Burlap is a challenging fabric to craft with and sew so don't get discouraged if you are struggling a bit. Check out my ten tips for working with burlap for help and please share if you have any additional tips or tricks.

Enjoy and happy holidays!
Erica

Saturday, December 19, 2015

New Large Burlap Zipper Bags!


I can't believe another week has come and gone. We're now only days away from Christmas and past the middle of the month, which is both fantastic and a bit stressful. The days seem so long, with the list of things to do always feeling like it is getting longer rather than shorter, but as a whole, the month is moving quickly.  It's always more challenging this time of year to have the time and focus to work on side projects and hobbies. Free time is consumed with seasonal events, friends and family visiting from out of town, and finding the perfect gift.

During a few late weeknights, I sewed up two large burlap zipper pouches in new color combinations that each create a different look and feel.  The first zipper pouch is sewn using a thick, brown and white woven upholstery fabric. The weight of the fabric provides structure to the bottom of the zipper pouch so it can stand on its own and hold its weight. While the bottom is a large, geometric print, it is offset by cream cotton canvas fabric on the inside. The contrast was intentional to balance out the busyness with the patterned fabric and burlap text against the simple, solid interior.

The second zipper pouch is a sewn using a chocolate brown faux leather bottom and a colorful cotton print on the inside of the burlap bag. There is white top-stitching on the seam of the leather bottom to give it a detailed, finished look. This pouch offers a more sophisticated look on the exterior in contrast with a playful look on the interior.


Both of these pouches feature a new, bronze metal zipper. (Note: It is hard to see this detail in the photo above.) The zipper pull is a thin metal square, which is a fun change from the usual triangular zipper pull and blends well  with the warmth of the burlap. These zippers are much easier to zip up than the prior 9" metal zippers I had used previously, which is an added bonus. They are also incredibly durable, as I managed to break my needle into three pieces this afternoon when I made a rookie mistake of not turning my sewing machine wheel by hand when sewing over the zipper, setting my needle up for a direct collision against the zipper teeth at full speed. Live and learn.

You can find these pouches available for purchase in the Lina and Vi Etsy shop here. Unfortunately, the date has past for orders guaranteed to arrive before Christmas. However, all orders will still ship as indicated on the listing via standard shipping.

I'll be back in the next couple of days with a brand new Make It tutorial to share for the holidays!

Erica

Sunday, December 13, 2015

Custom Michigan Cottage Burlap Pillow

Custom Michigan Cottage Repurposed Burlap Pillow  - linaandvi

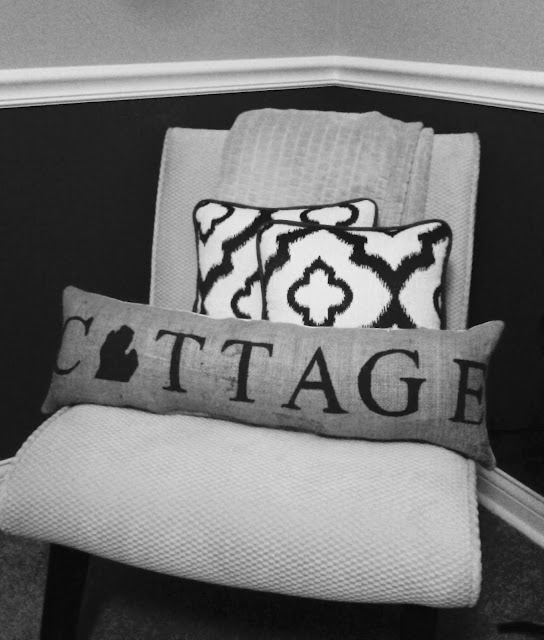
It's been a crazy week filling custom orders, but I'm back with a few photos to share of a recent custom pillow I created upon request from a customer. My customer was looking for a repurposed burlap pillow, similar to our Michigan Home pillows, but with the word "Cottage" rather than "Home".  It's pretty common for people in this part of the state to head "up north" (the generic term we like to use).  There is so much beautiful scenery and a lot of recreational activities to do in this state and many of us take advantage of getting away to a cottage or a lake to enjoy nature and get away from the city.  I thought this was a fun idea, so I took on the challenge of creating a new stencil to make this custom design, excited to think that I could potentially be a part of decorating someone's special getaway cottage here in Michigan.

Following my tried and true freezer paper stencil process I shared here, I got started on this pillow by printing out a few extra block letters that I did not already have from another stencil on hand. I then measured and traced the letters to freezer paper and cut them out with an X-Acto knife so that I would have clean, sharp lines, no matter how small of a cut I needed to make. I ironed the stencil to a long piece of repurposed burlap, hand-painted and sealed the text using black fabric paint and an iron, and then continued with sewing the pillow.

Custom Michigan Cottage Repurposed Burlap Pillow  - linaandvi

Custom Michigan Cottage Repurposed Burlap Pillow  - linaandvi

The Michigan Cottage burlap pillow has a light cream cotton canvas back, which is how I prefer to make our pillows since it provides structure and support to the burlap and fits with any color scheme. As you can see, this pillow is long - measuring at about 28 inches in length. I can imagine it on display on a long wooden bench in a hallway when you walk into a cottage or as an accent pillow on a love seat in a cozy living room.

I wish I had better photos to share, but with the shorter winter days, I just can't make it home in time during the week to take photos when there is light outside. It's not ideal, but aside from waiting until a weekend, the only option is to try to take photos using the lights I have available indoors in the evening. I changed these to black and white so that you could focus on the design of the pillow, rather than the distraction of the poor lighting and color tones.

With that, I'm off to work on a few new burlap items that I'm hoping to get listed this week in time for the last holiday rush.  We're taking all final orders by Wednesday 12/16 so hurry up and visit our Etsy shop for any last minute gift ideas!


Erica


Sunday, December 6, 2015

Weekend Wrap Up


Thank you to everyone who stopped by the Lina and Vi table on Friday night in Ann Arbor! This was my first time participating in the Kerrytown Kindlefest, so I really wasn't sure what to expect. It ended up being a fun and festive night. I could definitely feel the buzz with everyone doing a bit of holiday shopping and enjoying the winter-themed food and drinks. The holidays can be a stressful time with all of the gift buying and events, but the event on Friday night reminded me that it's okay to take it slow and enjoy the Christmas decorations, carolers, and food by simply strolling, not running, through this season of the year.

At any rate, I'm back in the sewing room today working on a few custom pillow orders that will be shipping out later this week. I'm creating a new pillow design for a local customer, and I'm really excited to be part of creating their vision.

This is me checking in to say thank you so much for the continued support from new and old friends, family, and those I haven't yet met. Sewing is one of my passions, and I am thrilled to be able to continue to share my creations with others. It's a little bit messy in here as I start on a new project, but I love it. Messes are the best.

Have a great weekend!
Erica

Tuesday, December 1, 2015

Kerrytown Kindlefest, Ann Arbor MI Friday Dec 4th!

I'm so excited to announce that I will be participating in the Kerrytown Kindlefest this Friday evening in downtown Ann Arbor, Michigan! The outdoor market will take place in the Ann Arbor Farmers Market on December 4th from 6 - 10 pm at 407 North Fifth Ave. This event will have music, fire pits, roasted s'mores, beer, wine, food, and of course, handmade crafts for sale!

I know that I say that I'm excited about a lot of things, but I am truly, honestly  thrilled to be part of the group of vendors selected for this event. I'm looking forward to seeing what the other talented vendors have on display this year, along with designing a festive, holiday themed table for the Lina and Vi bags and pillows.

If you are local to the metro Detroit or Ann Arbor areas, please stop by and say hello at the Lina and Vi table this Friday evening. Grab a bite of handmade food and take a stroll around the market as you kick off what is supposed to be a beautiful first weekend of December.

Find more details on the Facebook event page here.

Hope to see you Friday!
Erica